

AAAPOS RM Mobile Hub Setup & Configuration
How to install, edit and Configure RetailManager shopfronts and Paired Devices
Before you can start using RM Mobile on your Android phone, iPhone, iPad, or tablet, the first thing you need to do is download, install, and configure the AAAPOS RM Mobile Hub on the PC that holds the RetailManager database.
This training manual will guide you through:
Downloading and installing the AAAPOS RM Mobile Hub
Configuring RetailManager shopfronts
Testing communication ports
Adding and configuring paired devices
Editing and removing paired devices
Setting up security passwords
Understanding logging and task history
Section 1 – Downloading and Installing AAAPOS RM Mobile Hub
Step 1 – Download the Software
You would have received an email from AAAPOS containing the download link for the AAAPOS RM Mobile Hub setup.
To Download:
Click on the download link provided in the email.
If you have not received the email:
Go to the AAAPOS website
Scroll to the bottom of the page
Select Downloads
Locate the AAAPOS RM Mobile Download heading
Click on the download icon to commence the download
Step 2 – Start the Installation
Once the file has downloaded:
Double left-click on the setup icon.
Select Yes to allow the installation to begin.
Select Next.
Step 3 – Installation Options
Choose whether you want to create a desktop shortcut.
Ensure the following option is selected:
Start the Service Hub automatically when Windows starts
Select Next.
Select Install.
Section 2 – Connecting to Your RetailManager Shopfront
Step 1 – Add Your Shopfront
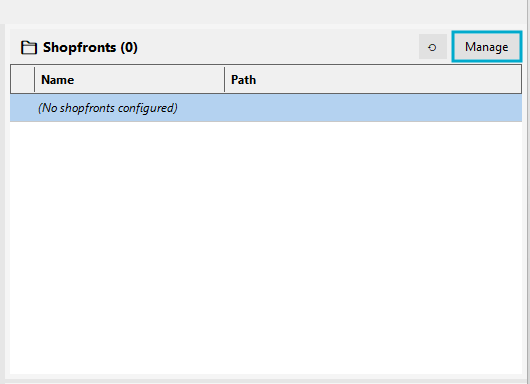
- In the RM Mobile Hub, locate the Shopfronts section.
- Select Manage on the far right-hand side.
Step 2 – Browse to Your Shopfront
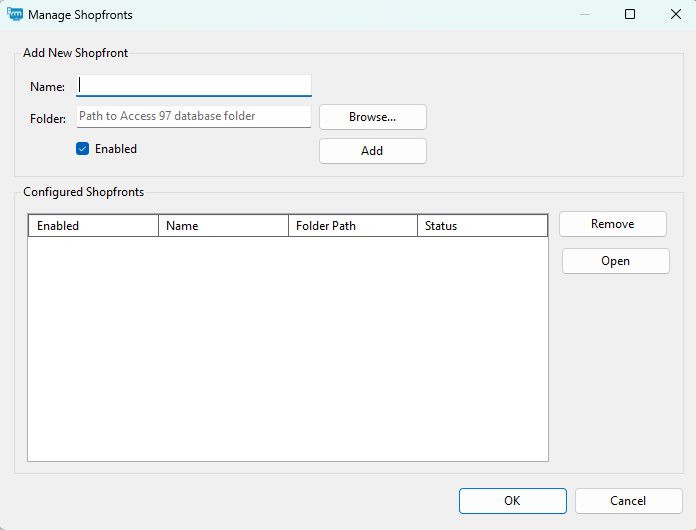
A new window titled:
Add New Shopfront
will appear.
To locate your shopfront:
Select Browse.
Navigate to your RetailManager folder.
This is usually located under:
C:\RetailM\Your Shopfront Name
Double left-click on your shopfront folder.
Select Select Folder.
If your database has a password:
Enter the password
Select OK
Step 3 – Add the Shopfront
Select Add.
Your shopfront will now appear in the configured shopfronts area.
Repeat this process if you have multiple shopfronts.
Select OK.
Section 3 – Testing the Communication Port
Step 1 – Open Settings
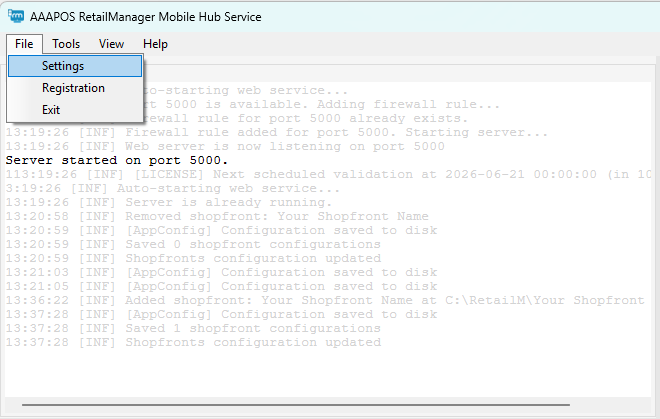
Select File.
Select Settings.
Step 2 – Test the Port
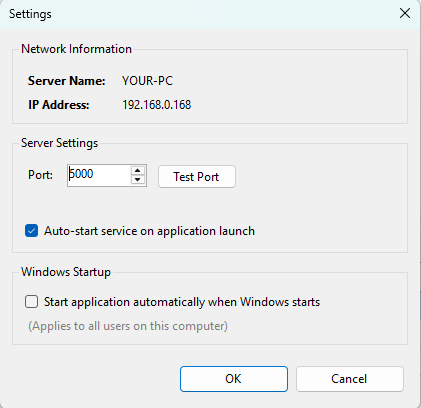
By default, RM Mobile uses:
Port 5000
To test the port:
Select Test Port.
If the port is available, you will see:
✅ Port 5000 is available
If the port is unavailable:
Change the port number to 5001
Continue increasing the number until an available port is found
Step 3 – Close Settings
Select the X to close the window.
Section 4 – Adding a Paired Device
There are two methods available for connecting the mobile app to the server:
- Auto Connection (Recommended)
- Manual Connection
Important:
- Your mobile device must be connected via WiFi on the same network as the AAAPOS RetailManager Mobile Hub Service application.
- Once configured and connected to the RetailManager shopfront, you will have the ability to go offsite to perform transactions, stocktakes, and other tasks in offline mode. When the device reconnects to the network, these transactions will automatically upload into RetailManager.
Auto Connection (Recommended)
The RM Mobile App is designed to automatically detect the server PC on the same network.
Step-by-Step Auto Connection:
Open the RM Mobile App on your mobile device.
The Server PC name should automatically appear in the available servers list.
Tap the Server PC name.
A pairing code will automatically pop up on the server PC.
Enter the pairing code into the RM Mobile App.
Select Connect.
Finally:
Select your shopfront on the mobile app
Sign in to complete the device pairing successfully
Manual Connection
Only use manual connection if the mobile app fails to automatically detect the server due to network restrictions or obstacles.
Step 1 – Open Paired Devices
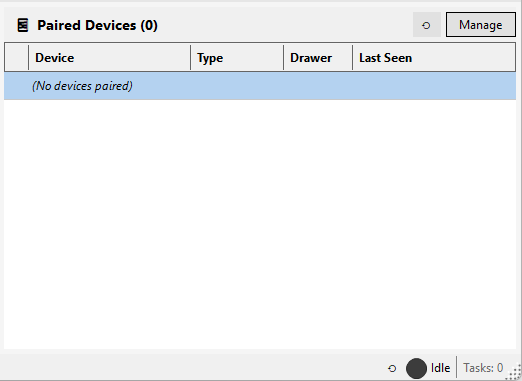
Locate the Paired Devices section.
Select Manage on the far right-hand side.
Step 2 – Configure the Device
Enter the following information:
Device Name
Device Type (e.g. Mobile)
Shopfront access permissions
Assigned cash drawer
Once completed:
Select Add Device.
Step 3 – Pair the Mobile Device
Once the device has been added:
A pairing code will appear.
This code must be entered into the RM Mobile App on the mobile device.
Important:
- RM Mobile must already be installed on the mobile device.
- If it has not yet been installed, refer to: How to Download, Install and Configure AAAPOS RM Mobile
Step 4 – Configure the Mobile Device
On the mobile device:
Open the RM Mobile App.
Select Settings.
Scroll down to Maintenance.
Select Manual Connection.
Now enter:
Host IP Address
Pairing Code
Port Number
The Host IP Address can be found below the pairing code in the RM Mobile Hub.
Once completed:
Select Connect.
Repeat the process for additional devices if required.
Step 5 – Close the Window
Select Close.
Congratulations!
You have now successfully setup the AAAPOS RetailManager Mobile Hub Service.
Finally:
- Select your shopfront on the mobile app
- Sign in to complete the device pairing successfully
Section 5 – Editing and Removing Paired Devices
Step 1 – Open Paired Devices
Open the RM Mobile Hub application.
Go to Paired Devices.
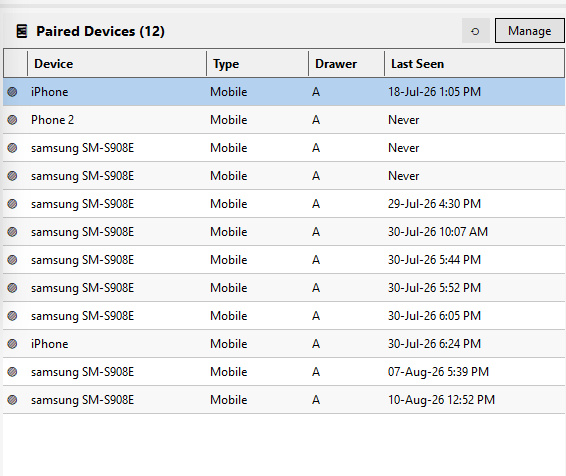
Select Manage on the far right-hand side.
You will now see a list of connected paired devices.
Device Management Options
Select the device you wish to manage.
On the right-hand side, you will see the following options:
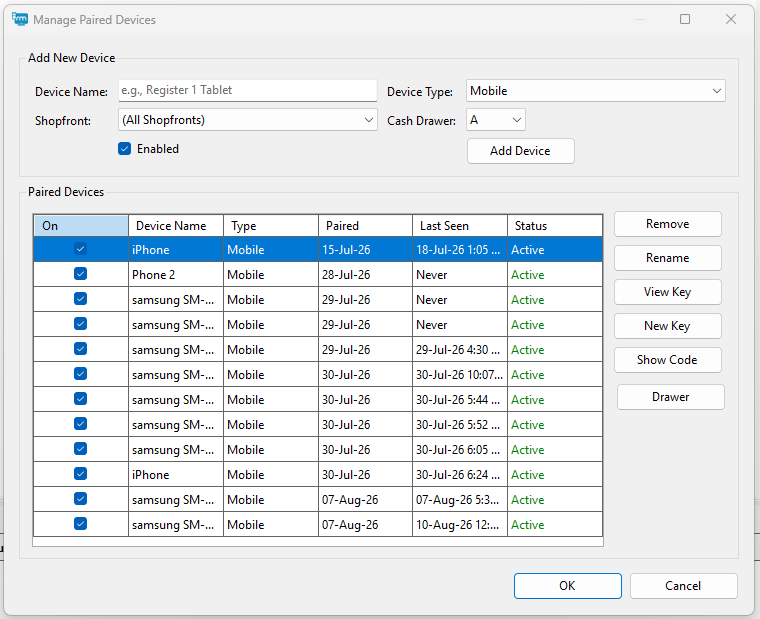
1. Remove
Use this option to permanently remove the device.
Common Examples:
A staff member has left the business
They were using their own personal mobile device
To Remove a Device:
Select Remove.
Select Yes to confirm.
2. Rename
Use this option to rename the device.
This helps identify which device belongs to which staff member or area.
Examples:
Shop iPad
Counter Tablet
Mobile Sales Phone
3. View Key
This option displays the API key assigned to the device.
Important:
This is a secure key unique to that specific device.
4. New Key
This option creates a brand-new API key.
Only use this option:
If the current connection is experiencing issues
If the device requires reauthorisation
Important:
The mobile device will need to be reconfigured after generating a new key.
5. Show Code
Displays a new pairing code for the device if required.
6. Drawer
This option allows you to change the assigned cash drawer.
Examples:
You may wish to:
Separate mobile sales from store sales
Cash up road sales independently
Allocate devices to different operators or departments
Section 6 – Setting Up a Security Password
Protect the RM Mobile Hub from unauthorised access.
Step 1 – Open Security Settings
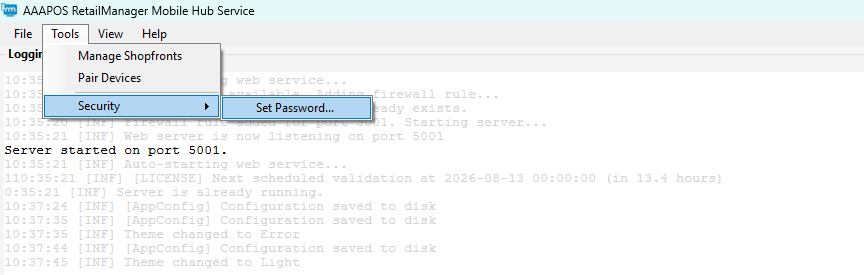
Select Tools.
Select Security.
Select Set Password.
Step 2 – Create the Password
Enter your password.
Re-enter the password to confirm.
Select Show Passwords if required.
Step 3 – Save the Password
Select Set Password.
From now on each time the software is opened, the password must be entered before access is granted. This helps protect the application from unauthorised tampering.
Section 7 – Logging and Task History
Within the AAAPOS RetailManager Mobile Hub Service application, you will also notice:
Logging Window
Task History Window
These windows are used to:
- Monitor mobile devices
- Track tasks performed
- Identify connection issues
- Display errors and warnings
These tools are extremely useful for troubleshooting and identifying issues that may occur.
