

RM Mobile Sales Window
Just like AAAPOS RetailManager, almost everything happens through the Sales Window. This is where you create transactions, add customers and products, apply discounts, and finalise sales. This guide explains each feature and how to use it.
Opening the Sales Window
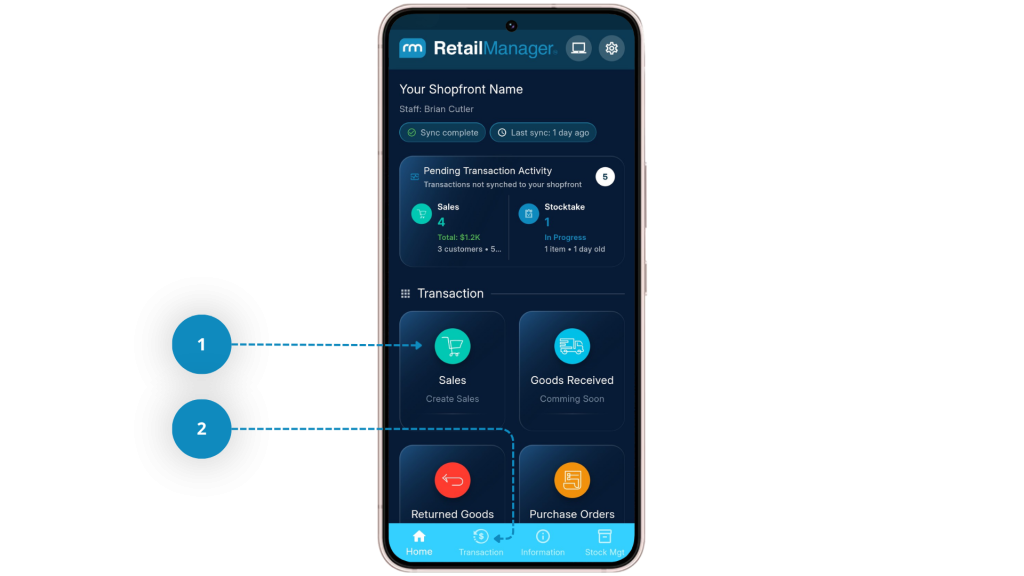
From the RM Mobile Dashboard, you can open the Sales Window in two ways:
Select Sales under the Transactions section
Tap the Transactions button on the bottom navigation menu
The Sales Window will now open.
Pending Sales
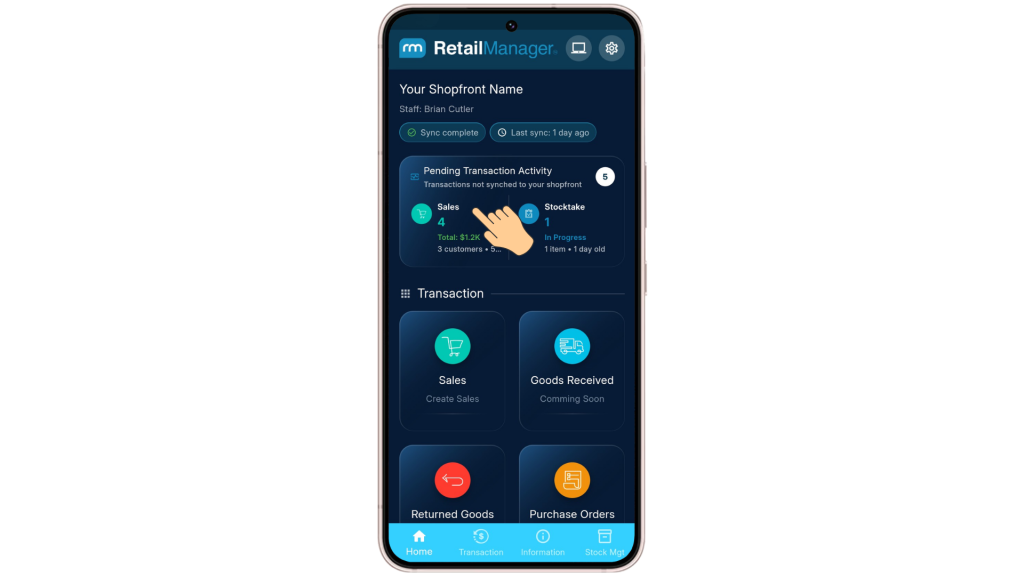
If you have any unfinished transactions, a Pending Sales Transactions notification will appear on the dashboard.
Tap this notification to view all pending sales. From here you can:
Continue an existing transaction
Finalise an existing transaction
Merge Transactions
Tap New Sale to begin a new transaction
Merging Transactions
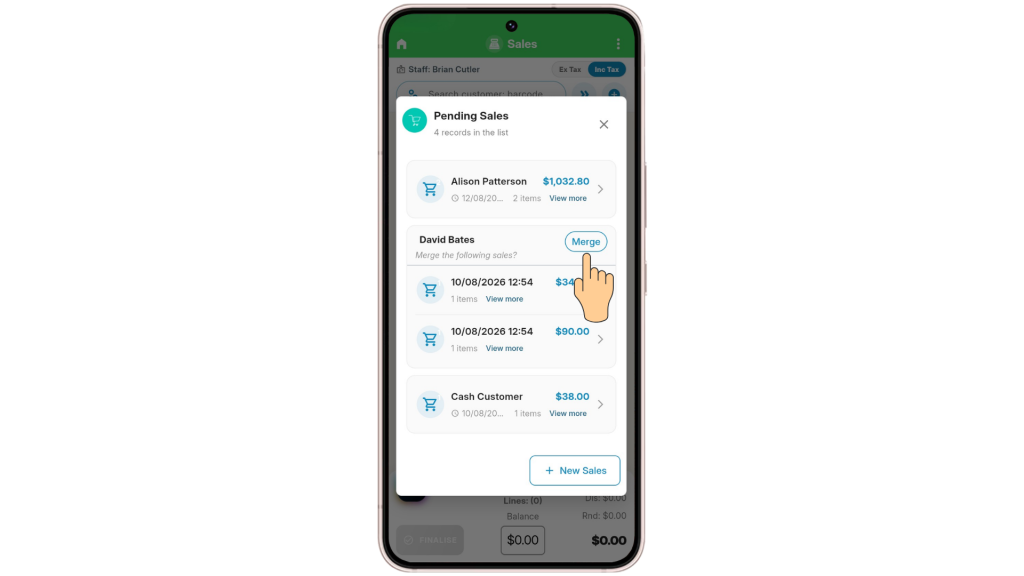
The Merge Transactions feature allows you to combine two or more pending transactions for the same customer into a single transaction. This is especially useful when a customer has multiple pending orders.
How to Merge Transactions
From the Dashboard, locate the Pending Transactions section
Select Pending Transactions to display all pending sales
Transactions are automatically grouped by Customer
Next to each customer’s name, select the Merge button
Tick the transactions you want to merge
Select Done
Review the confirmation window and select OK to complete
Once merged, all selected transactions will be combined including:
Products
Comments
Order Numbers
Other transaction details
Important: If the transaction includes a delivery, always check that the Delivery Address is correct after the merge has been completed.
Tip: If you need to merge two transactions but only one has a customer assigned, open the unassigned transaction, add the correct customer, then return to Pending Transactions. They will now be grouped under the same customer for merging.
Sales Window Layout Options
Tap the Menu button in the top-right corner to choose from three display layouts:
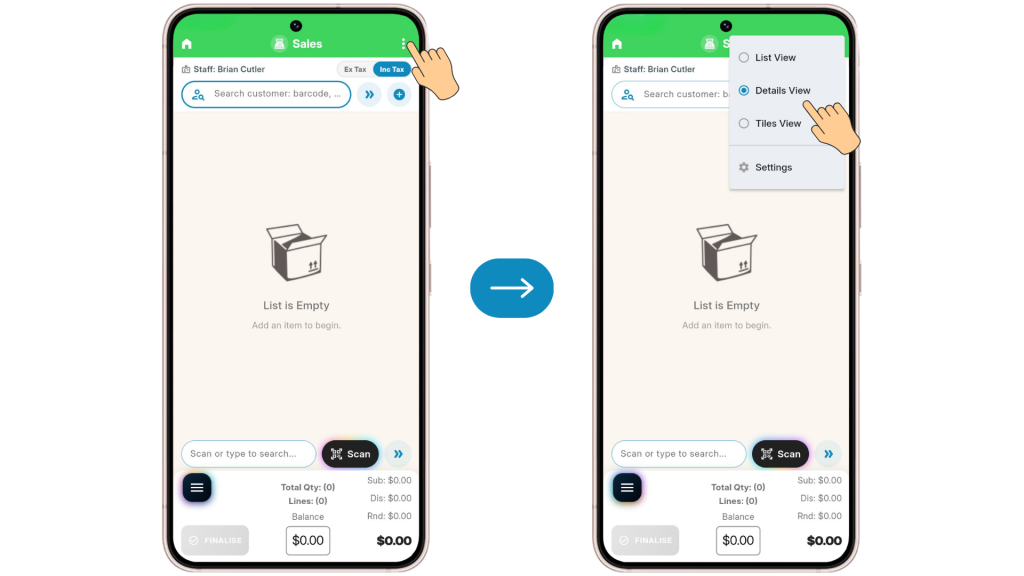
List View
Displays Barcode, Description, Quantity, and Sell Price. Designed for maximum products on screen and fast processing.
Details View
Includes everything in List View plus the product image. Provides more information while remaining easy to read.
Tiles View
Includes everything in Details View plus Department, Category, Custom 1 & 2 Fields, and Extended Description. Ideal for browsing products visually.
Sales Window Settings
Tap Settings from the Menu to customise how the Sales Window operates.
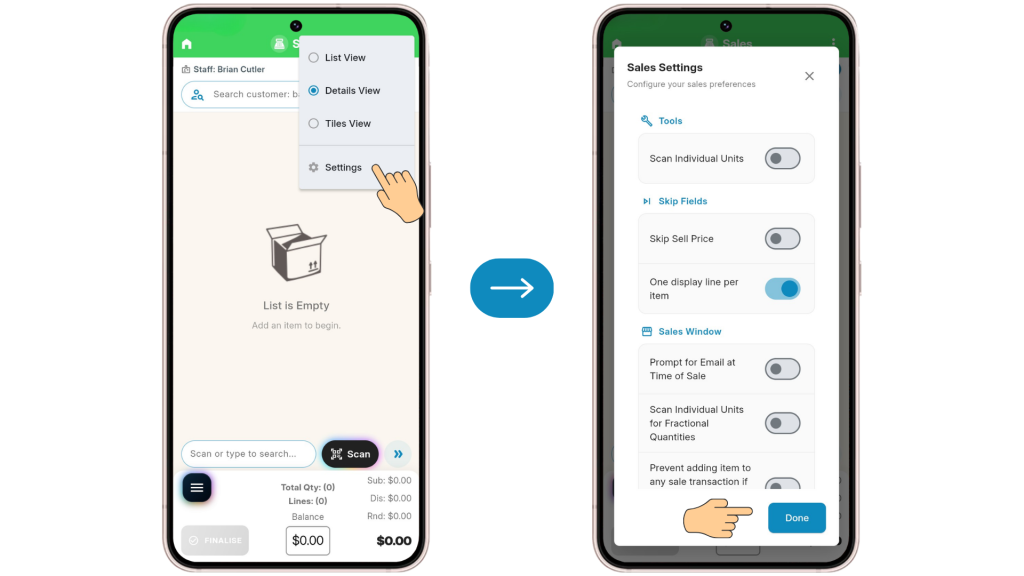
Tools
Scan Individual Units
Enable this option if you normally sell products one at a time or scan every item individually, such as in supermarkets or convenience stores.
Skip Fields
Skip Sell Price
If you rarely change the selling price during a sale, enable this option.
This skips the Sell Price field and speeds up transactions.
One Display Line Per Item
When multiple quantities of the same item are scanned at the same price, they will automatically combine into a single line instead of displaying separately.
Sales Window
Prompt for Email at Time of Sale
When enabled, you will be prompted to email the customer’s receipt after committing the transaction.
The email is batched and later sent from RetailManager at a time of your choosing.
Scan Individual Units for Fractional Quantities
Sets the default selling quantity for products sold in fractional amounts to 1.
This is useful if you normally sell whole units of these products.
If disabled, you will be prompted to enter the quantity each time.
Prevent Adding Items When No Stock is Available
Prevents products with no stock on hand from being added to the sale.
Prevent Finalising Tax Invoices When Items Are Out of Stock (Sales Orders & Lay-Bys Allowed)
When enabled, Tax Invoices cannot be completed if any product is out of stock.
Sales Orders and Lay-Bys are still permitted, allowing stock to be ordered and supplied later before converting the transaction into a Tax Invoice.
Other
Auto Reminder – Low Stock
Displays a warning whenever the stock level falls below the minimum quantity configured in RetailManager.
Alerts
Prompt for Scan Individual Units for Fractional Quantities
Displays a reminder asking whether to scan fractional quantity products individually.
Display Customer Messages During Sale
Displays any customer notes entered in RetailManager during the transaction.
Example: Account overdue. Please request payment before adding further purchases to account.
Layout
Finalise Button on Right Side
By default, the Finalise button appears on the left side of the screen.
Enable this option if you prefer it on the right-hand side for easier thumb access.
Include Finalise Button in Menu
Removes the Finalise button from the main Sales Window and places it inside the Menu instead.
After configuring your settings, tap Done to return to the Sales Window.
Starting a Sale & Selecting a Customer
The Sales Window displays the currently logged-in staff member.
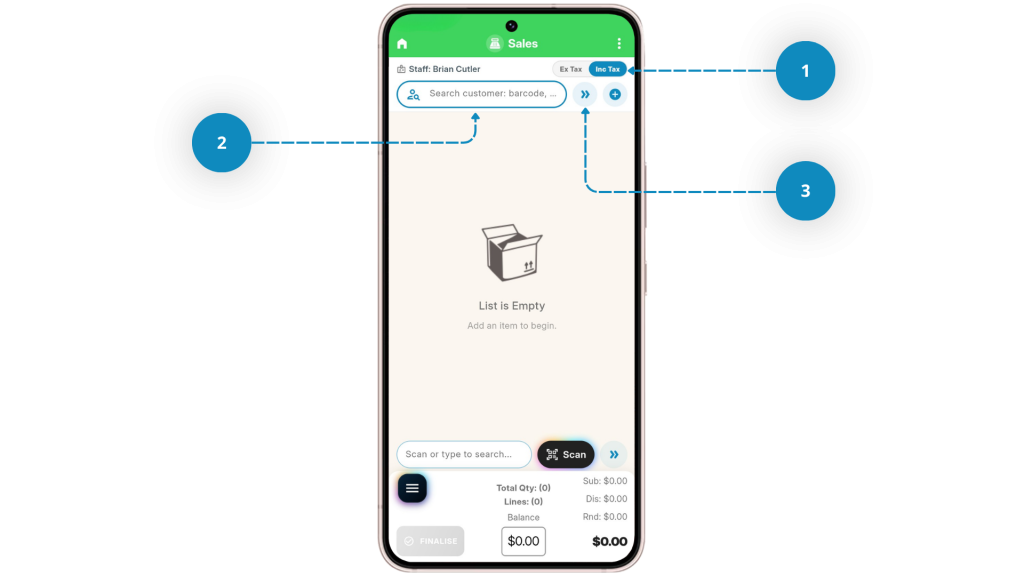
You can also choose whether prices are displayed:
- Including Tax
- Excluding Tax
Select whichever option suits your business.
Adding a customer is optional.
To locate an existing customer:
- Search by name
- Company
- Telephone number
- Other customer details
Alternatively, tap the double-arrow button to open the complete customer list.
From here you can:
- Sort customers
- Search the list
- Select a customer
A green person icon indicates the customer has an account.
Once you have selected a customer, their assigned Pricing Grade will be displayed, allowing you to confirm that the correct pricing is being applied. You will also see the customer’s Sales History, which displays all previous transactions for that customer, excluding archived data. This provides a quick and convenient way to review recent purchases without leaving the Sales Window.
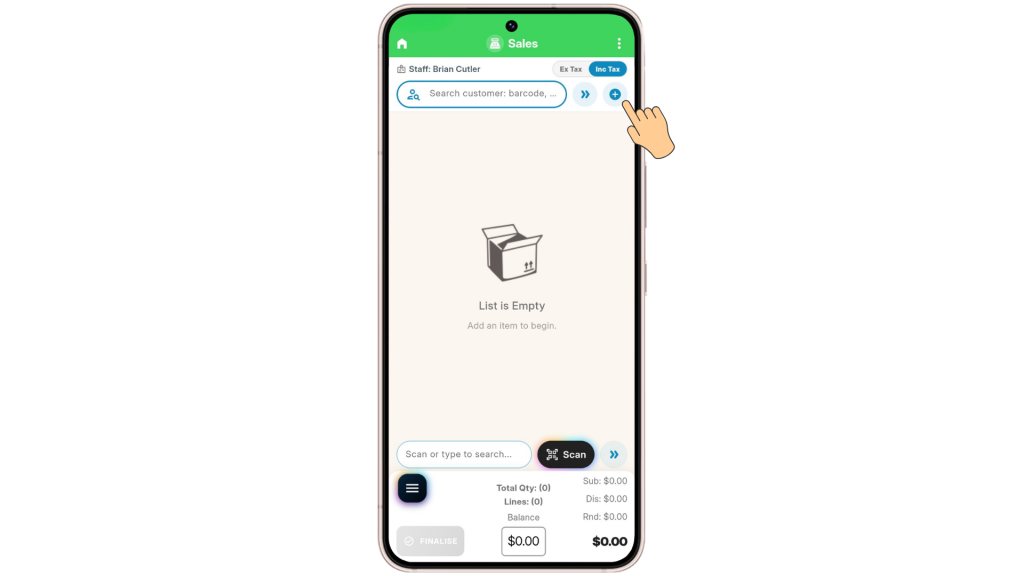
Creating a New Customer
Tap the + (Plus) button.
Enter:
- Customer Number (or leave blank to automatically generate one)
- Customer details
Tap Create Customer when finished.
Adding Products
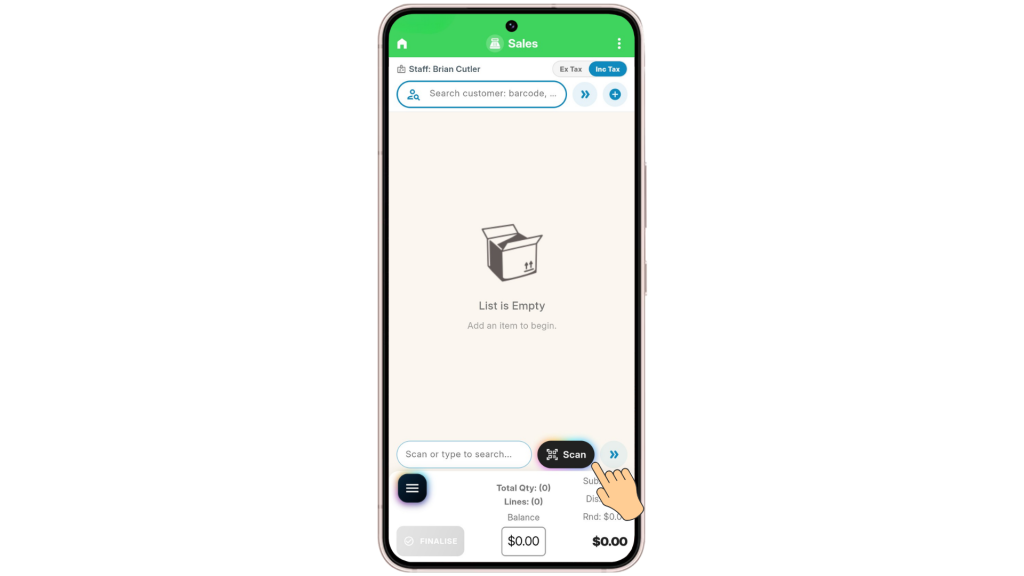
Scan Products
Tap the Scan icon to open your camera for barcode scanning. Use the Torch button in low-light environments.
Search Products
Search using barcode, description, or other product information. Tap the double-arrow button to display your complete stock list, which can be sorted and searched.
Editing Products During a Sale
Tap any product already added to the transaction to access these options:
Tax information
Gross Profit information
Change Sell Price
Pricing Calculator
Change Quantity
Last Selling Price
Pricing Grade selection
Delete Item
Commit Changes
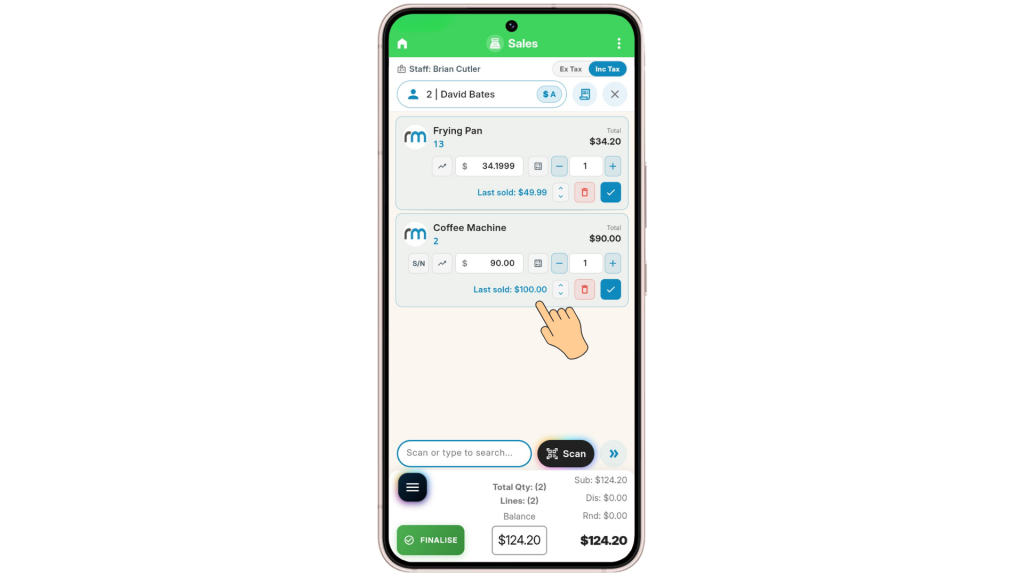
If Serial Number Tracking is enabled, an S/N button will appear allowing you to select, add, or scan a serial number. If not entered here, you’ll be prompted at finalisation.
Swipe left on a product to remove it, or swipe right to view full details and make changes. Items on promotion will also be shown.
Transaction Totals
At the bottom of the Sales Window you will always see:
Subtotal
Discount
Rounding
Total Quantity
Total Line Items
Balance Due
Sales Menu Options
Tap Menu to access additional transaction options:
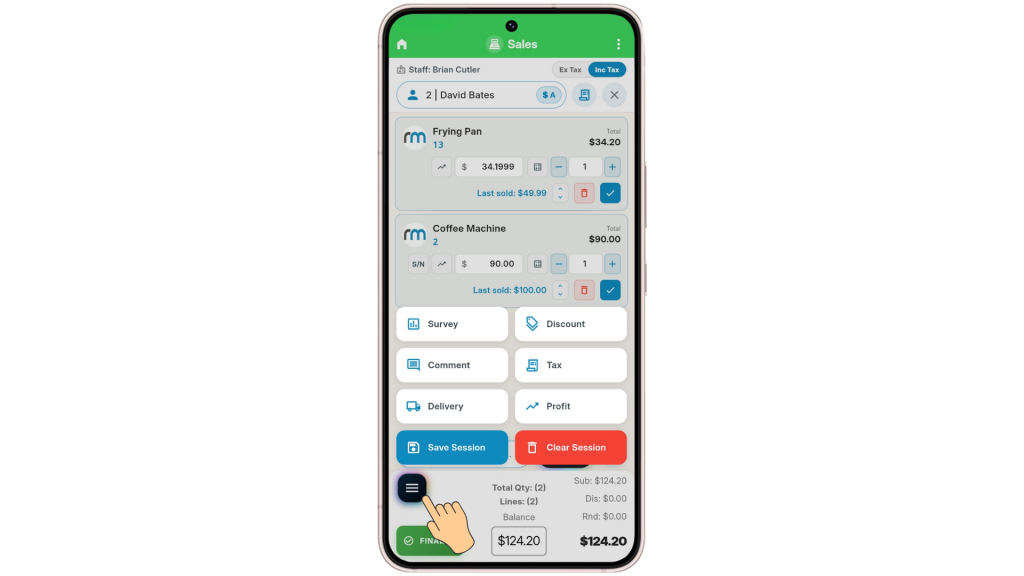
Survey Field — This field can be renamed in RetailManager (e.g. Order Number). Enter or scan the required information, then tap Save.
Discount — Apply a Dollar Discount, Percentage Discount, or Target Total (enter T and the final amount). Select Apply Discount or Clear Discount.
Comment — Add comments relating to the transaction. Tap Save when finished.
Tax — Displays the total tax for the transaction.
Delivery — Enter delivery information. If delivering to a different address, select the Deliver To drop-down, choose Other Address, enter details, and tap Commit.
Profit — Displays the expected profit for the transaction.
Save Session — to continue the transaction later
Clear Session — to discard the current sale
Finalising the Sale
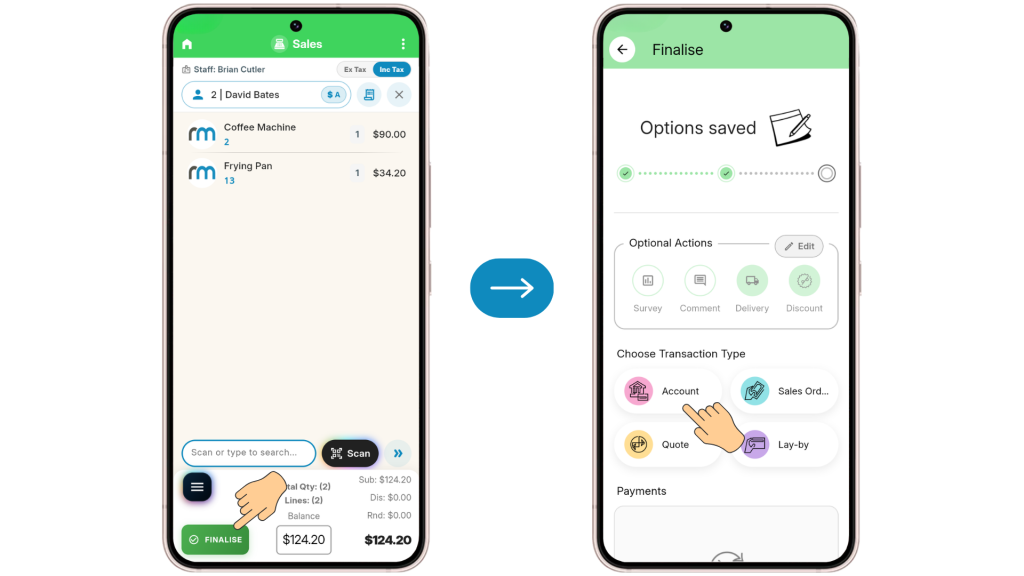
When ready, tap Finalise. A new screen allows you to review or edit Survey, Comments, Delivery Information, and Discount. Tap Done when finished.
Choose the required transaction type:
Account
Sales Order
Quote
Lay-By
Commit
Completes the transaction immediately.
Email & Commit
Completes the transaction and queues the receipt to be emailed later from RetailManager. You can review the email address and add additional addresses separated by commas or semicolons (no spaces).
Important Information
If a transaction will sell below cost or result in a loss, RM Mobile will always display a warning before allowing the transaction to proceed.
If a surcharge has been configured for the selected transaction type (e.g. fuel levy or service fee), a pop-up will appear during finalisation. The surcharge will be automatically calculated and added to the transaction total.
